Skip to content

Documentation · FastCompositor

FastCompositor.

Finish a render with a look, set its strength, compare it with the original and save your own variations. FastCompositor adds a reversible finishing stage to Blender's compositor, and the nodes you already had keep working underneath.

Version  v1.2.0 Requires  Blender 5.2 LTS+ By  Contrast 3D Design Studio

01 · Overview

Finished looks, compositor intact.

Pick a look in the N panel and FastCompositor builds it after your render. If the scene already has a compositor, FastCompositor wraps its output instead of replacing it: your nodes and File Output nodes keep running, and Remove Effects puts the compositor back exactly as it was.

01

Choose

16 looks plus Neutral in four collections: Film & Photo, Graphic, Paint and Light. One click applies a look and turns the add-on on.

02

Adjust

Look Strength, Compare Original and up to six controls chosen for the active look. Edit Look opens every control, grouped by topic.

03

Keep

Save the result as a look of your own, update it, rename it, and move it between scenes and computers as a JSON file.

Requires Blender 5.2 LTS or newer; earlier releases are not supported, because the add-on uses compositor nodes they don't have. Tested on Blender 5.2.2 LTS, Windows, with EEVEE and Cycles final renders. macOS and Linux have not been validated.
New in v1.2.0: three new looks, Engraving, Neon Sign and Anamorphic, for 16 in total plus Neutral. Auto Range measures each frame and fits the tone-driven looks to the range your render actually uses, so a night scene no longer prints as solid ink and an overexposed one as blank paper. Cartoon's ink line and the paint brush keep their proportion at 4K. Scrubbing the timeline is faster: on a 1920 × 1080 Cyberpunk Neon scene the add-on's own work per frame went from 32.4 ms to 1.4 ms (the compositor's own time is unchanged). The panel now says which version built a scene's effects and offers Repair Effects without rebuilding anything until you click it, reports missing thumbnails or a missing Film Dust image, and skips a damaged record in your library instead of hiding the rest. A scene from 1.1.1 renders identically in 1.2.0.

Try FastCompositor Free

A free edition of the same add-on, version 1.2.0, so you can see how it works on your own renders before buying. It includes:

  • Four looks: Neutral, Film Noir, Comic Dots and Polaroid.
  • The basic controls: Exposure, Contrast, Saturation, Vignette and Grain.
  • Look Strength and Compare Original.
  • The same reversible wrapper: Remove Effects restores your compositor.

What stays in Pro

The other twelve looks, the compact controls chosen for each look, the full editor with Edit Look and Create, Save Look, and the Look Library with import and export.

Free and Pro can't be installed side by side. Both use the same extension id, so one replaces the other. To upgrade, save your .blend, disable the Free extension and install the Pro ZIP over it; restart Blender if it asks. Your scenes keep their look and settings.

Index

Documentation sections.

A quick reference while you work in Blender. Each section covers one part of the add-on.

02 · First use

Installation.

Install the extension

  1. Download FastCompositor_Pro_v1.2.0.zip or FastCompositor_Free_v1.2.0.zip.
  2. In Blender, open Edit → Preferences → Get Extensions.
  3. Open the menu at the top right of that window and choose Install from Disk.
  4. Select the ZIP and enable the extension.
  5. In the 3D Viewport, press N and open the FastCompositor tab.
  6. Click any look button. That enables FastCompositor and applies the look.
Install the ZIP as you downloaded it. Don't unzip it first.

Updating

Install the new ZIP over the old one from Get Extensions → Install from Disk. Your scenes and saved looks are kept. If a scene was made with a version whose effect group has changed, the panel names that version and offers Repair Effects; nothing is rebuilt until you click it.

Opening a 1.0 or 1.1 scene in 1.2 keeps its saved controls, its original compositor and your node edits.

Coming from 0.13? Save a copy of the scene first. Disable and remove the old add-on before enabling the new one; don't run both together. Open the scene and click Upgrade / Enable. The old compositor is kept so it can be restored, and the existing scene controls are kept. If an old custom preset can't be identified, its current values still work: save them as a new look. Settings that 0.13's preset format never saved can't be rebuilt from that preset.

Uninstalling

FastCompositor builds its effects from ordinary Blender nodes saved inside your .blend, and uninstalling the extension doesn't touch those files. So, before you uninstall:

  1. Open each .blend where you used FastCompositor.
  2. In each scene where the panel shows it enabled, click Remove. This puts back the compositor the scene had before, restores the Normal and Mist pass settings and releases the bundled dust image.
  3. Save the file.
  4. Open Edit → Preferences → Get Extensions, find FastCompositor and choose Uninstall.

If you uninstall first, those scenes keep rendering with their look and there is no panel left to change it. To recover, reinstall FastCompositor and click Remove in that scene, or open the Compositing workspace and assign your original compositor again: it is the node group inside the node labelled Your original compositor. Saved looks are not deleted by uninstalling; they stay in fast_compositor/looks.json in Blender's user configuration folder until you delete it.

03 · License

No activation needed.

There is no account, no licence key and nothing to activate. Install the ZIP and every tool of your edition is there. The add-on makes no network requests, sends no telemetry and runs no licence checks, and it never saves Blender's global preferences when you save a look.

Licence

The code and the original assets it includes are supplied under GPL-3.0-or-later, like Blender. You can use FastCompositor on commercial work, and the renders you make with it are yours.

Modifying it

You may study and modify the code. If you distribute a modified version, it has to stay under the GPL. Blender is a separate product of the Blender Foundation.

04 · UI map

Interface overview.

Everything lives in 3D Viewport → Sidebar (N) → FastCompositor. Before the add-on is on, the panel shows Enable FastCompositor (or Upgrade / Enable in a scene made with an older version), but clicking any look turns it on as well. Enable, Remove, Reset and every control change can be undone with Ctrl+Z.
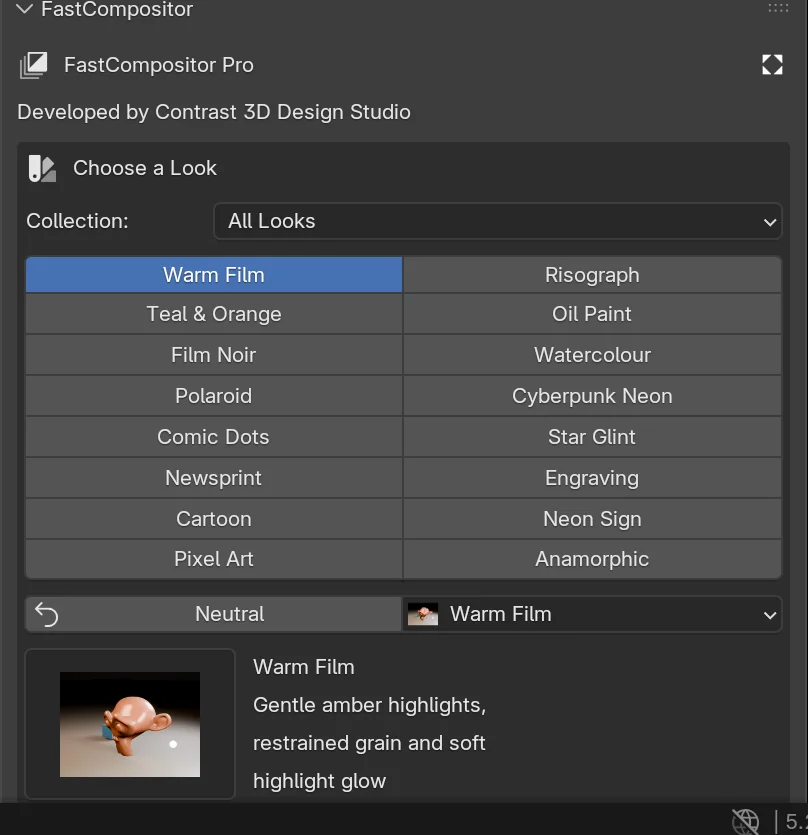
FastCompositor panel with the Collection menu, the sixteen look buttons, Neutral and the Warm Film preview
A

Choose a look

  • Collection filters the buttons: All Looks, Film & Photo, Graphic, Paint or Light.
  • Look buttons apply a factory look. Click one again to restore its full recipe after you've changed it.
  • Neutral clears every effect.
  • The dropdown next to Neutral lists the factory looks and your saved looks.
  • Click the preview picture to browse the thumbnail gallery. The thumbnails are renders of one reference scene, not a live preview of yours.
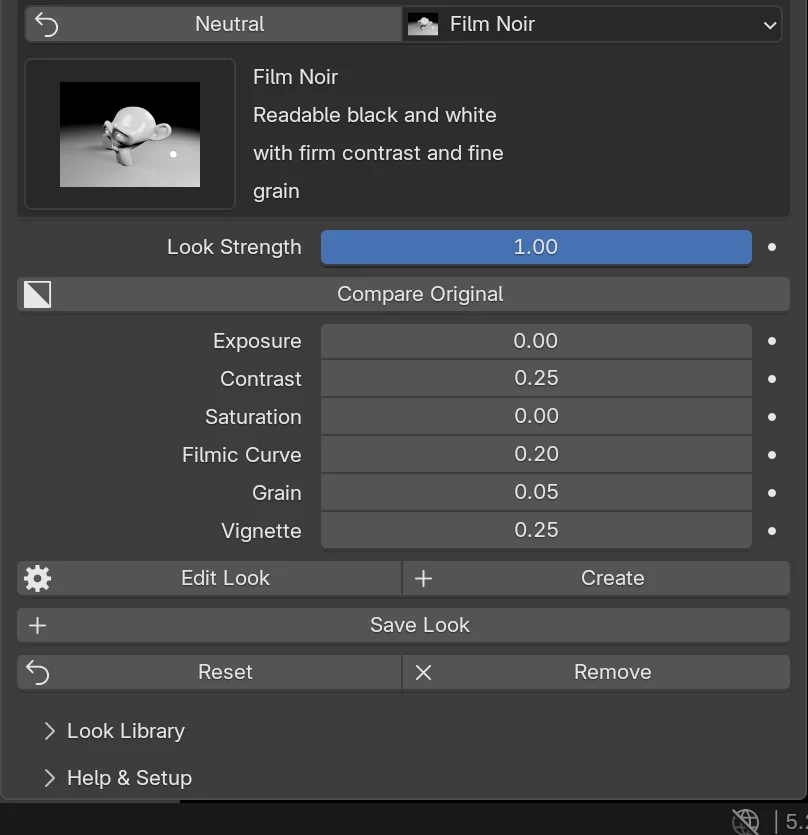
Compact view for Film Noir: Look Strength, Compare Original, six controls, Edit Look, Create, Save Look, Reset and Remove
B

Strength, compare, adjust

  • Look Strength blends the finished look over the image coming into FastCompositor. At 0 you get that image back.
  • Compare Original switches the look off for a moment without losing your settings.
  • The compact controls: up to six chosen for the active look.
  • Edit Look opens every control; Create starts a new look from Neutral.
  • Save Look stores the current settings as your own look; Update appears when a saved look is active.
  • Reset sets every effect back to neutral. Remove (Remove Effects) restores the compositor you had before.
  • Look Library and Help & Setup are collapsible sub-panels underneath.
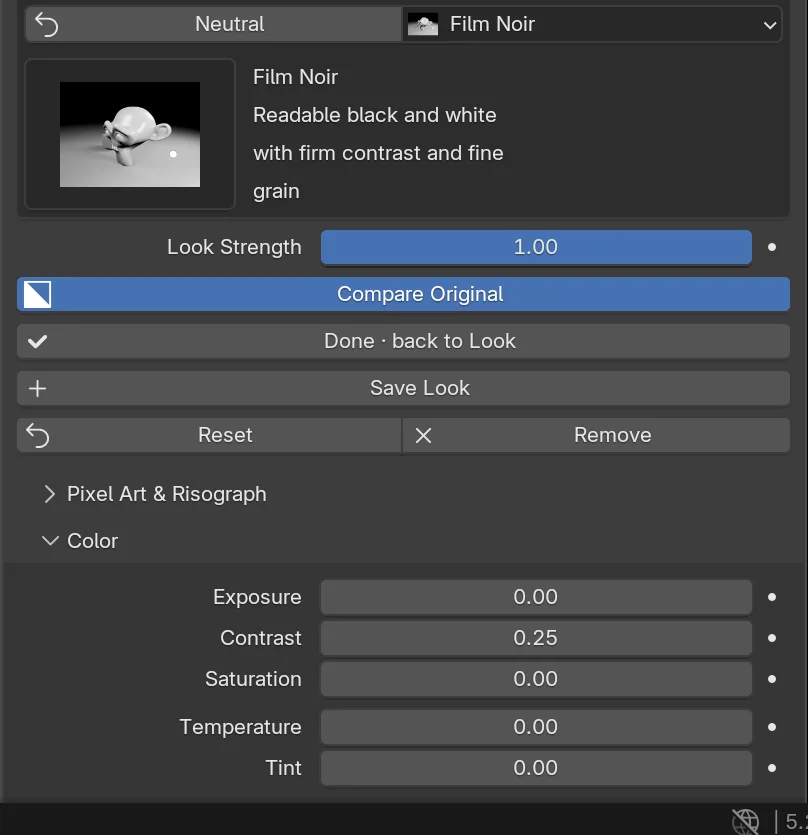
Full editor: Done · back to Look, Save Look, Reset, Remove and the Color sub-panel open
C

The full editor

Edit Look replaces the compact controls with every control in collapsible sub-panels, from Color to Frame & Flares. Done · back to Look returns to the compact view.

Each sub-panel is described in Every control, by panel.

When something needs attention (a missing pass, a damaged effect group, a scene built by another version) the panel shows the message at the top, with the button that fixes it.

05 · Catalogue

The looks.

16 factory looks plus Neutral. Every picture below is the add-on's own render of the same reference scene, so you can compare what each look does; on your scene the result depends on lighting, materials, exposure and resolution. Start with Exposure and Look Strength, then the compact controls.
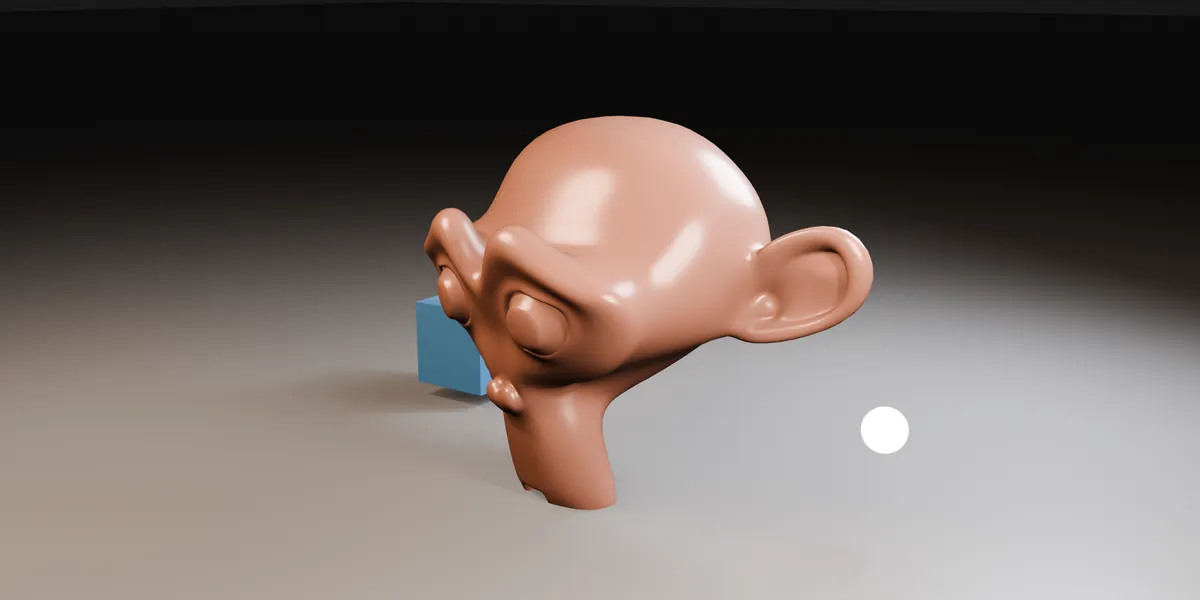
The reference scene with Neutral: no effect applied

Neutral

The reference scene with no effect, the starting point of every picture below. Neutral resets every effect control and preserves the source image and alpha.
Film & Photo

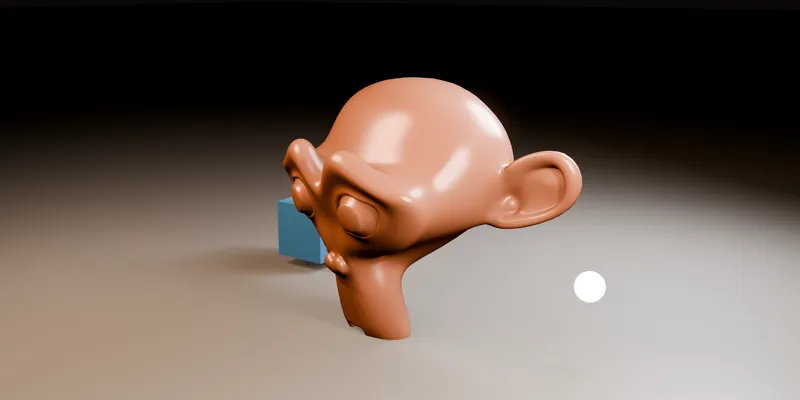
Reference render with the Warm Film look

Warm Film

Restrained warmth for products and daylight scenes. Temperature changes the warmth, Halation adds highlight bleed, Grain sets the texture.
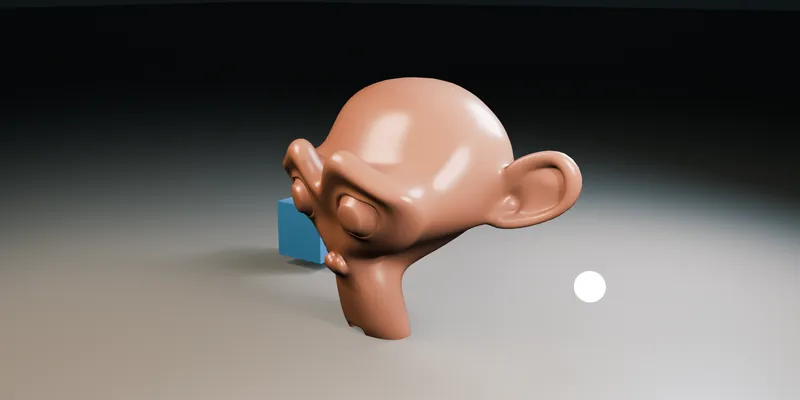
Reference render with the Teal & Orange look

Teal & Orange

Cool shadows and warm highlights. The editor exposes Split Amount and both colours for stronger separation.
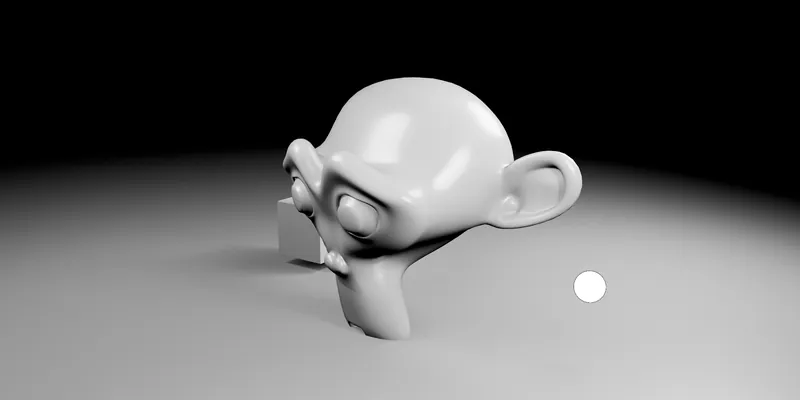
Reference render with the Film Noir look

Film Noir

Clear monochrome with firm contrast and fine grain. Exposure and Contrast protect the subject in low-key lighting. Included in Free.
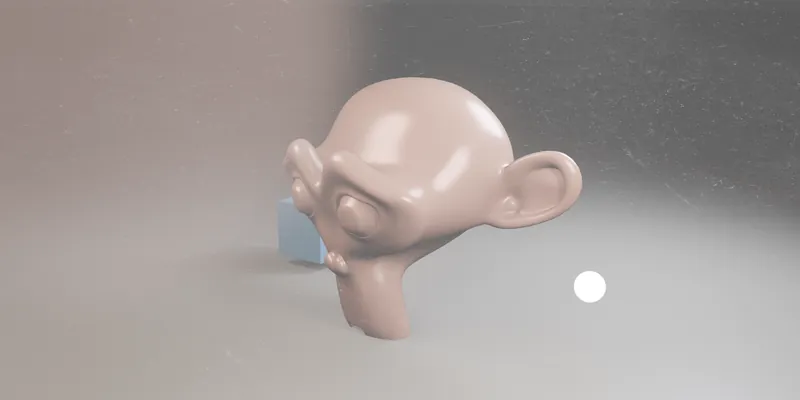
Reference render with the Polaroid look

Polaroid

Faded instant-photo colours, a corner leak and Contrast's own dust plate. Fade, Leak and Dust are independent. A stylistic recipe, not a physical film simulation. Included in Free.

Graphic

Reference render with the Comic Dots look

Comic Dots

Full-colour round halftone. Dot Size and Shadow Spread set the screen; Keep Image retains the source colour. Included in Free.

Reference render with the Newsprint look

Newsprint

Warm paper and dark halftone ink. A fixed ink and paper palette sets it apart from Comic Dots.
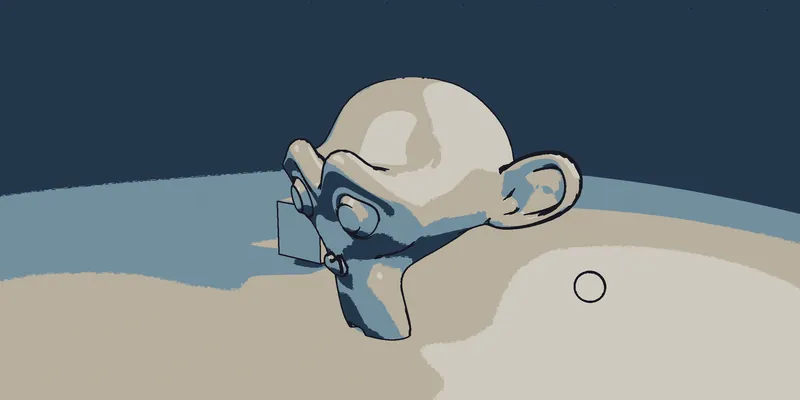
Reference render with the Cartoon look

Cartoon

Four cel colours with an ink outline. Input White spreads the palette across a dark input; Line Sensitivity controls which edges become ink.
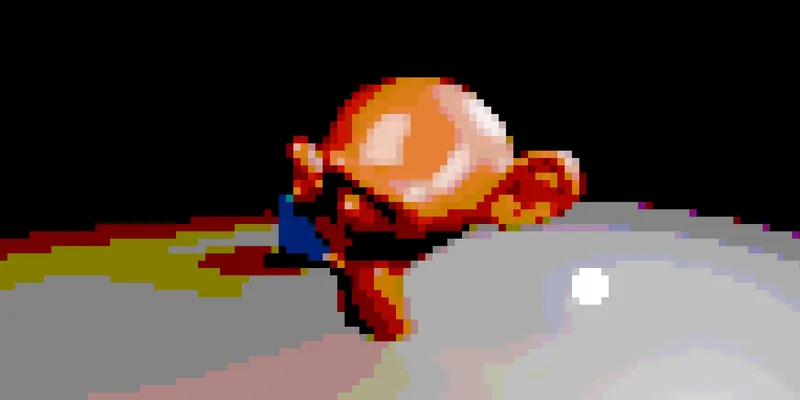
Reference render with the Pixel Art look

Pixel Art

Native Pixelate plus Posterize. Block Size changes the grid; Colour Steps reduces each RGB channel. A stylized filter, not a fixed indexed game palette.
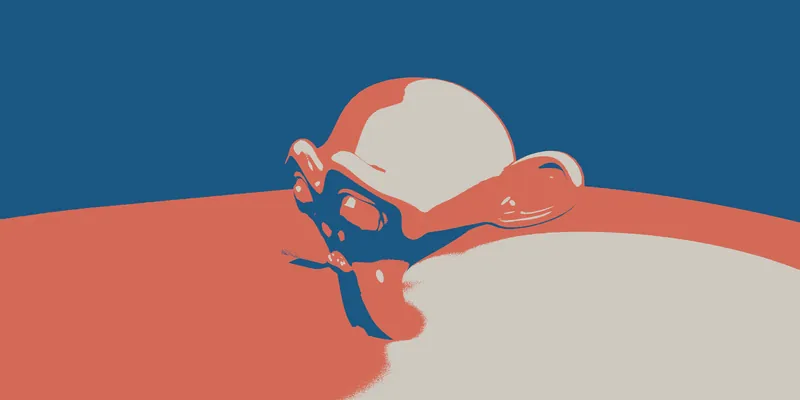
Reference render with the Risograph look

Risograph

Coral and blue ink shapes on cream paper. Ink Coverage redistributes the tones; Ink Offset shifts the blue plate horizontally. All three colours are editable. A visual treatment, not a press simulation.
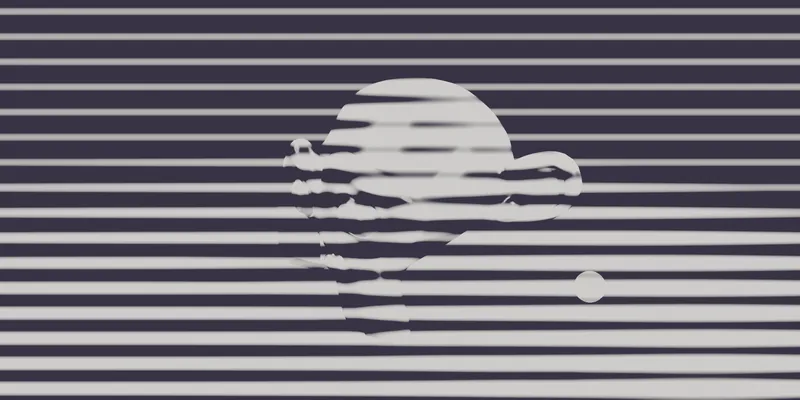
Reference render with the Engraving look

Engraving

Parallel ink lines that thicken as the image darkens, like a banknote engraving. Line Count sets the spacing, Line Weight how fast the lines fatten, Direction turns them horizontal, vertical or diagonal. New in 1.2.0.
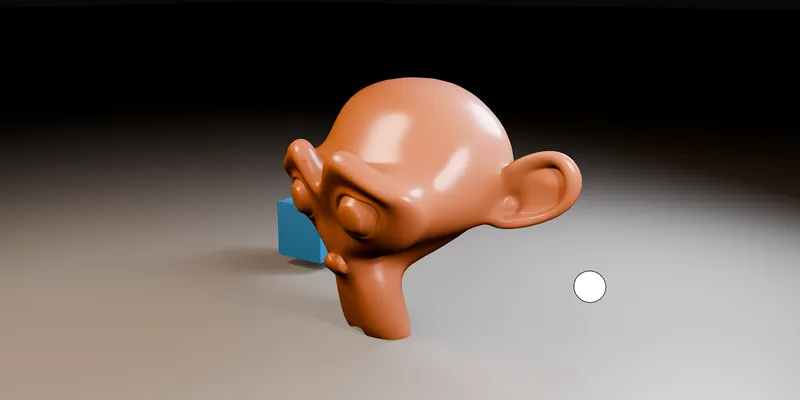
Paint

Reference render with the Oil Paint look

Oil Paint

Directional Kuwahara smoothing with pigment rims. Best on texture and detailed lighting; Brush Size and Detail change the strokes.
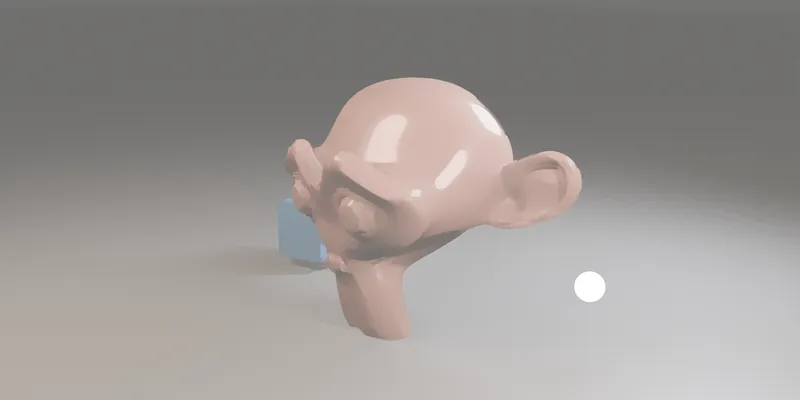
Reference render with the Watercolour look

Watercolour

Softer classic Kuwahara washes and lighter paper. Lower Edge Darkening when bright details get too strong a rim.
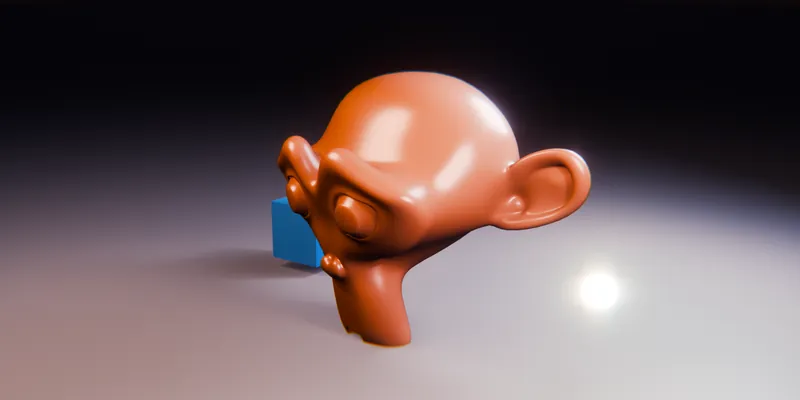
Light

Reference render with the Cyberpunk Neon look

Cyberpunk Neon

Violet and magenta tones, bloom and colour fringing. Most legible with neon, emissive signs or coloured light.
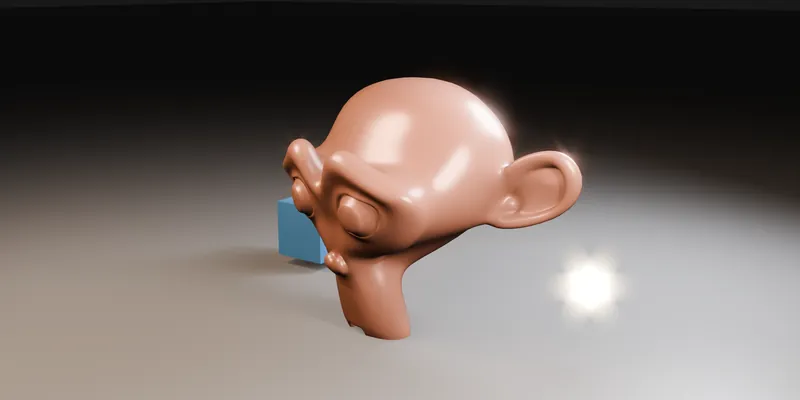
Reference render with the Star Glint look

Star Glint

Six-point glare on bright lights and reflections. Threshold selects the highlights, Length extends the arms, Points changes the pattern. It needs a highlight; it doesn't invent one.
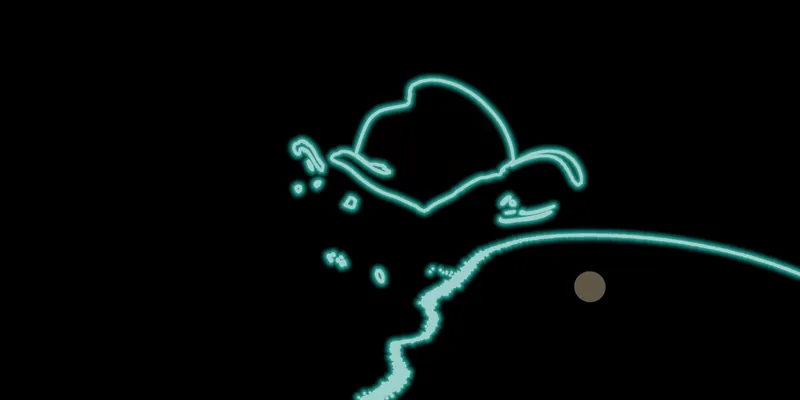
Reference render with the Neon Sign look

Neon Sign

The bright shapes are traced as a lit tube and the rest of the frame is put out. Neon Pickup chooses how much of the image lights up; Tube Width and Neon Glow shape the sign. It needs something bright to trace. New in 1.2.0.
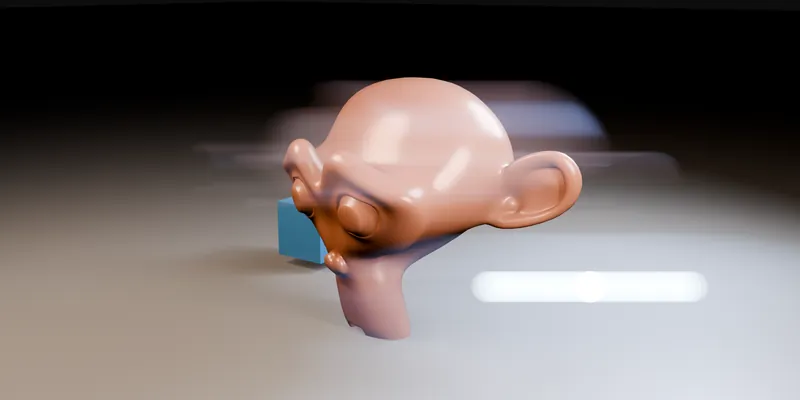
Reference render with the Anamorphic look

Anamorphic

A single horizontal flare stretched off the highlights, the signature of an anamorphic lens. Flare Length sets how far it reaches; Flare Tint is blue by default. New in 1.2.0.

Photographic looks keep intense light cores; graphic palettes and paint outlines remap tones on purpose. Your AgX or Standard colour management stays as you set it.
Retired names. Golden Hour, Vintage, Moody, Bleach Bypass, Sepia, Matrix, Dreamy, Matte Paint and Pop Art left the factory selector in 1.1. Scenes saved with them keep their actual controls; the panel labels them Legacy. Save an old setup as a look of your own to keep it in your gallery.

06 · Reference

Every control, by panel.

Edit Look shows the full editor (Pro). Its sub-panels are listed here by topic; every control can be keyframed. Sizes given in pixels refer to a 1920-pixel long edge and scale with the render resolution.

6.1

Color

  • Exposure (stops), Contrast and Saturation (0 = black and white).
  • Temperature (cooler to warmer) and Tint (green to magenta).
  • Look Range: Auto Range measures each frame and fits the look to the tones it really uses. Set it to 0 to choose Input Black and Input White yourself; they take over as Auto Range goes down.
  • Hue, and Lift, Gamma and Gain to tint shadows, midtones and highlights.
6.2

Stylize

  • Filmic Curve: a film-style S-curve.
  • Bleach Bypass: a desaturated copy laid back over the image.
  • Duotone remaps the image between Dark Tone and Light Tone by luminance.
6.3

Glow & Bloom

  • Bloom (switch in the header) with Strength, Threshold and Size.
  • Soft Glow and Glow Size: a blurred copy screened over the image.
  • Streaks: light streaks from bright points, independent of Bloom.
6.4

Lens

  • Vignette, with Vignette Size and Vignette Softness.
  • Chromatic Aberration: RGB lens fringing.
  • Lens Distortion: barrel or pincushion.
6.5

Atmosphere

  • Fog and Fog Color: depth haze from the Mist pass.
  • If the Mist pass is off, the panel says so and offers Enable Required Passes.
6.6

Detail & Grain

  • Sharpen: an unsharp mask for detail.
  • Grain and Grain Size.
6.7

Texture Overlay

  • An image slot for your own dust, paper, grunge or leaks.
  • Blend: Overlay, Multiply, Screen, Soft Light or Add, and Amount.
  • The image is referenced, not copied into exported looks.
6.8

Comic

  • Comic (switch in the header): cel shading with ink outlines from the Normal and Mist passes.
  • Cel Steps and Line Strength.
6.9

Halftone / Dots

  • Halftone, Dot Size and Shape (Diamond, Circle, Square).
  • Keep Image: 0 is pure ink on paper, 1 shows your graded render under the dots. Ink and Paper colours.
  • Shadow Spread pushes dark tones to solid ink.
  • Subject Only puts dots only on rendered geometry; it needs Render → Film → Transparent, and the panel offers Enable Transparent Film.
  • Invert and Organic (jittered dot grid).
6.10

Polaroid

  • Fade and Fade Tint: lifted, tinted blacks.
  • Split Amount with Shadows, Highlights and Balance.
  • Halation with colour, threshold and size.
  • Light Leak with colour, X, Y, size, softness and blend (Screen or Add).
  • Film Dust: Contrast's original dust and scratches plate.
6.11

Cartoon

  • Cartoon and Flatten.
  • Range: Input Black and Input White.
  • Bands: four colours (Shadow 2, Shadow, Mid, Light) and the three points where one band gives way to the next.
  • Ink Line: Absolute or Camera-aware, Line Width, Line Colour and Line Sensitivity.
  • Turbulence and Turbulence Scale for a hand-drawn wobble.
6.12

Paint

  • Paint and Style: Oil Paint, Matte Paint or Watercolour.
  • Brush Size, Edge Darkening and Detail.
  • An image filter: it responds to scene detail and doesn't create geometry or physical brush strokes.
6.13

Pixel Art & Risograph

  • Pixel Art, Block Size and Colour Steps.
  • Risograph, Ink Coverage, Ink Offset, and the Shadow Ink, Midtone Ink and Paper colours. Risograph keeps the incoming alpha.
6.14

Engraving, Neon & Anamorphic

  • Engraving: Line Count, Line Weight, Direction (Horizontal, Vertical, Diagonal), Engrave Ink and Engrave Paper.
  • Neon Sign: Neon Pickup, Tube Width, Neon Glow, Tube Colour and Dim Background.
  • Anamorphic: Flare Length, Flare Tint and Flare Pickup.
6.15

Frame & Flares

  • Star Filter: Length, Points, Threshold and Tint. It uses Blender's native HDR glare; 4 and 8 points give different streak patterns.
  • Letterbox: cinematic bars with Aspect (2.39 by default) and Bar Colour.
  • Burn-In: text over the render (watermark, shot name, review note) with Text, Text Size, X and Y.

Letterbox and burn-in stay visible during Compare Original and at zero Look Strength.

6.16

Look Library

  • Import Looks and Export Look.
  • Rename Look and Delete Saved Look when a saved look is active. Deleting keeps the current values in the scene.
  • The library is fast_compositor/looks.json in Blender's user configuration folder; Preferences shows the path. One previous version is kept as looks.json.bak. Library file operations are not reversed by Undo.
6.17

Help & Setup

  • Pass Layer: the view layer that provides the Normal and Mist passes.
  • Show in Viewport turns the viewport compositor back on if you changed it.
  • Open Nodes jumps to the Compositing workspace.
  • Repair Effects rebuilds FastCompositor's own effect group. Your original compositor and look settings are kept; hand edits inside that group are reset.

07 · In practice

Typical workflows.

A

Try looks, then check with F12

  1. Click a look. The viewport switches to Material Preview with its compositor on.
  2. Try other looks and set Look Strength; use Compare Original to judge.
  3. Render with F12. The final render is the reference: the preview uses viewport dimensions, so dots, grain, blur and lines can differ.
B

Fine-tune and save your own look

  1. Start from the closest factory look, or click Create to start from Neutral.
  2. Adjust the compact controls, or open Edit Look for all of them.
  3. Click Save Look. Later, Update overwrites that look with the current values.
C

Move looks between computers

  1. Look Library → Export Look writes a versioned JSON file. Choose a new filename if one exists.
  2. Send the JSON, plus any image used in Texture Overlay.
  3. On the other machine, Import Looks, then relink the image under Texture Overlay.
D

Animate a look

  1. Keyframe Look Strength or any control the usual way.
  2. Values update on frame change and at render start.
  3. Don't keyframe the look selection or library actions; Compare is a temporary review state.
E

A scene that already has a compositor

  1. Click a look. FastCompositor wraps the existing output without clearing or replacing its nodes; File Output nodes keep running.
  2. Keep editing your original node group upstream (Help & Setup → Open Nodes).
  3. Its Image output stays the source: select its image layers in that original graph. Required Normal and Mist passes are enabled on the selected layers and their previous flags come back on removal.
  4. Remove Effects restores the compositor exactly as it was.

08 · Best practices

Tips that pay off.

  • Auto Range for dark or overexposed scenes. The halftones, Cartoon, Pixel Art, Risograph, Engraving, the paint edge and the Polaroid fade decide things from tone; Auto Range fits them to each frame. On an animation with a big exposure change, hold Auto Range at 0 and set Input Black and Input White by hand for a stable result.
  • Material Preview vs the Cycles viewport. The Cycles rendered viewport doesn't provide every pass that Cartoon, Comic and Fog use. Adjust those in EEVEE Material Preview and check with F12; the panel warns you when this applies.
  • GPU compositor. Set Render Properties → Performance → Compositor → Device to GPU if you have a capable graphics card.
  • Large Kuwahara radii, dense halftone, glare and 4K images slow the preview. Lower the preview resolution or the effect size while you work.
  • Paper and palette colours pass through the scene's display transform: a linear value of 1 isn't display-white under AgX. Use Standard if that suits your graphic work.
  • For transparent cutouts with Risograph or Subject Only, enable Film → Transparent and remove any visible floor.
  • Star Glint and Neon Sign work from the bright areas of the render: they need a highlight to start from and don't invent one.

09 · Fix common issues

Troubleshooting.

IssueFix
No FastCompositor panelCheck that you're on Blender 5.2 LTS or newer, that the extension is enabled, and press N in the 3D Viewport.
No visible effectChoose a look, raise Look Strength, turn off Compare Original, and use Help & Setup → Show in Viewport or render with F12.
Cartoon, Comic or Fog look wrong in the Cycles viewportThat viewport lacks some of the passes they use. Adjust them in Material Preview and confirm with F12.
"Fog needs the Mist pass"Click Enable Required Passes in Atmosphere, or pick the right view layer in Help & Setup → Pass Layer.
"Needs a transparent background" (Subject Only)Click Enable Transparent Film, or turn on Render → Film → Transparent.
Missing view layerChoose a valid Pass Layer in Help & Setup.
A graphic look prints as solid ink or blank paperThe render is very dark or overexposed. Raise Auto Range in Color, or set Input Black and Input White yourself.
Preview and final render differPixel-sized dots, blur, grain and lines follow the viewport dimensions in preview. The final render is the reference.
Preview is slowLower the preview resolution or the effect size, and set the compositor device to GPU.
Deleted effect node, or "created with FastCompositor x.y"Click Repair Effects. It keeps your original compositor and your look settings, and resets hand edits inside FastCompositor's group.
"Look thumbnails are missing" or "Film Dust plate is missing"The installation is incomplete. Reinstall the ZIP.
Missing texture in an imported lookRelink the image in Texture Overlay. The look keeps its reference.
An imported look file is rejectedImport checks the whole file before writing anything: files up to 1 MiB and 200 looks, no invalid numbers, unknown controls or unsupported schema versions.
Saved library can't be readClose Blender and restore looks.json.bak as looks.json, keeping the damaged file. Factory looks remain available.
Uninstalled with effects still onThe scene keeps rendering its look. Reinstall and click Remove, or reassign Your original compositor in the Compositing workspace.
Free and Pro installed togetherThey can't be: both use the same extension id. Disable Free and install the Pro ZIP over it; scenes keep their settings.

10 · FAQ

Frequently asked.

Which Blender versions does it support?

Blender 5.2 LTS or newer. It uses compositor nodes that don't exist in earlier versions. Tested on Blender 5.2.2 LTS on Windows; macOS and Linux have not been validated.

Does it change my existing compositor?

No. It wraps the current output. Your nodes and File Output nodes keep working, and Remove Effects restores the compositor as it was.

Does it work with Cycles?

Final renders with Cycles work. The Cycles rendered viewport lacks some passes used by Cartoon, Comic and Fog, so adjust those in Material Preview and confirm with F12.

Is the gallery a live preview of my scene?

No. The thumbnails are renders of one reference scene, so you can compare what each look does. On your scene the result depends on lighting, materials, exposure and resolution.

How fast is it at 4K?

On our test machine (Ryzen 7 7800X3D, GeForce RTX 5060 Ti, Windows), a full 3840 × 2160 EEVEE frame of the studio test scene took between 2.3 and 2.6 seconds with the compositor set to GPU, depending on the look, and between 3.5 and 12.3 seconds with the compositor on CPU, Oil Paint being the slowest. Those are single timings of four looks (Neutral, Cyberpunk Neon, Cartoon, Oil Paint) that include rendering and saving the file. Your scene and hardware will differ. Set Render Properties → Performance → Compositor → Device to GPU if you have a capable graphics card.

How do I update to a new version?

Install the new ZIP over the old one. Scenes and saved looks are kept. If an update changes the effect group, the panel offers Repair Effects and waits for you to click it.

How do I uninstall it cleanly?

Click Remove in every scene that uses it and save, then uninstall the extension. The full steps are under Installation.

What is the difference between Free and Pro?

Free has Neutral, Film Noir, Comic Dots and Polaroid with exposure, contrast, saturation, vignette and grain, plus Look Strength and Compare Original. Pro has all 16 looks, the compact controls for each look, the full editor and the look library with import and export. Both use the same extension id, so Pro installs over Free and your scenes keep their settings. The Free edition is available on this page.

What does the GPL licence mean for me?

The code is licensed GPL-3.0-or-later, like Blender. You can use FastCompositor on commercial work, and the renders you make with it are yours. You may study and modify the code; if you distribute a modified version, it has to stay under the GPL.

How do I get support?

Write to support@contrast3d.com with your Blender version, operating system, edition, the steps that lead to the problem and, if you can, a small scene you are allowed to share.

11 · Support & links

Get help.

Before you write in

  • Blender version.
  • Operating system.
  • Edition (Free or Pro) and FastCompositor version.
  • The exact steps that lead to the problem.
  • A small scene you are allowed to share, if you can.

Finish the render, keep the compositor.

Pick a look, set its strength, compare it with the original, open the full editor when you need it and save the result as your own look. Remove Effects puts everything back the way it was.

FastCompositor v1.2.0 Pro and Free Blender 5.2 LTS+ contrast3d.com support@contrast3d.com